Week 4: Running Detections and Classifiers on the Mouse Directory
April 1, 2026
Hi everyone, welcome back to my blog! This week, I worked on creating a systematic process for running and analyzing the pyHFO codebase’s detectors and classifiers on our wild-type SYNGAP mouse directory. Using the “Markitdown” utility, I was able to build a structured workflow for tracking the types of classifications applied to High-Frequency Oscillations (HFOs).
In creating this process, classification in pyHFO works as this three-stage process. The first stage is the HFO artifact classifier, which determines whether a detected event is a real HFO or an artifact. It outputs 1 for a real HFO, 0 for an artifact, and -1 for events that were skipped because they fell within the ignore region (the first and last N seconds of a recording). Then, the second stage is the spike classifier (spkHFO), which asks whether a given HFO is spike-associated. This stage only runs on events that passed the first stage, that is, events where HFO = 1. It uses the same output scheme with 1 for spike-associated, 0 for not spike-associated, and -1 for skipped. The third stage is the eHFO classifier, which evaluates whether an HFO is epileptogenic, and follows the same logic, it only processes events that were classified as real HFOs in stage one. So if you see a row where HFO = 0 and spkHFO = -1, it means the event was classified as an artifact in the first stage, and the spike classifier was never run on it.
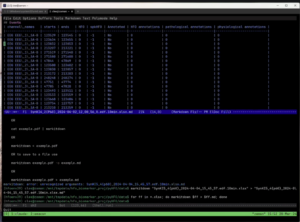
In the image above, the Markitdown utility has converted the .xlsx output from the pyHFO pipeline into a readable table, displayed directly inside our terminal editor Emacs. Markitdown is practically this lightweight Python tool that converts spreadsheets and other file formats into plain text, which made it much easier to quickly scan through classification results without opening each file manually in Excel.
The table shown above in the image is from the Syngap mice recording, where each row represents one detected HFO candidate event. The channels listed on the left, EEG_1_SA-B, EEG_2_SA-B, and EEG_3_SA-B, are these three EEG electrode pairs placed at different sites on the mouse’s scalp, all recording simultaneously. Looking at the results, every row shows HFO = 0 and spkHFO = -1, which means the classifier decided that all detected candidates on these channels were artifacts, so the spike classifier never even ran on them.
To process our full SYNGAP dataset across all four age groups, P60, P90, P120, and P150, which refer to the postnatal day the mouse was recorded, we created and ran the following batch command on our server, which was this: “for ff in data/*.edf; do echo python scripts/pyhfo_quick_detect.py $ff –classify –device “cuda:0″ –xlsx –output-dir data; done”. This loops over every recording file, runs the pyHFO detector and classifier on each one, and saves the results as an .xlsx file. Markitdown then converted those spreadsheets into the table format shown above, letting us review everything right in the terminal.
So this week’s blog was able to explain how we created a more technical, systematic process to assess for HFOs in SYNGAP1 as a biomarker on this mouse directory. We have successfully run the detector and classifiers on some of the full P60 mouse datasets, but it seems there is another hang in the pyHFO codebase that still needs to be fixed. So for next week, I will be diving into that and attempting to run the detectors and classifiers across different mouse datasets, and hopefully showing you guys the outputs.
Reader Interactions
Comments
Leave a Reply
You must be logged in to post a comment.
Hi Dhruv, nice work this week! I really liked how you broke down the three-stage classification process, it made the technical pipeline feel much easier to follow (especially the explanation of what the -1 values mean). One question I had was: do you have a sense yet of whether getting all HFO = 0 results is expected for those recordings, or does it suggest something might be off with the detector or preprocessing?