First two tests failed (Shock Tube Blog #11)
May 10, 2025
Hi all,
We’ve had a crazy few days of testing; I’ll try not to go into too much technical detail because it gets really confusing really quicky, but feel free to post a comment if you’re more interested in a certain part!
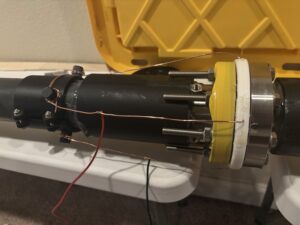
We left off finished with making and installing our first diaphragm, so after a few more finishing touches, we tested the shock tube for the first time on Tuesday. However, it was actually pretty uneventful. The diaphragm just didn’t pop, even when I repeatedly depressurized the driven tube and powered the heating element for a long time. The battery was heating up, so I figured current must be making its way through the circuit and heating up the diaphragm as well, but when I opened up the system after venting the pressure, the diaphragm was just at room temperature.
At first, this really didn’t make sense to me, but after a lot of multimeter testing, I found two potential reasons why the test failed. The first is the inconsistency of my power supply. I had used 12 volt batteries which claimed to have a max current of 23 amps, but I found that in practice, when given a <1 ohm load, they provided almost no voltage. This was very disappointing, and it would probably explain all the issues I had had with those batteries before. I decided to just switch to using my power supply, which actually gave a consistent 12V voltage.
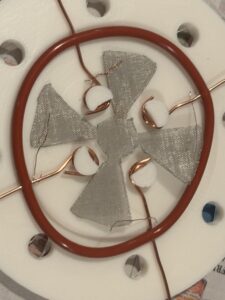
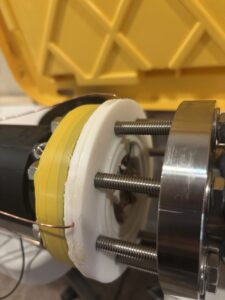
After fixing this and testing the diaphragm, it was heating up, but it was really inconsistent due to the second reason why the first test likely failed: the finicky nature of the diaphragm wires. Sometimes, when the diaphragm was moved or handled, they would get out of alignment and cause the resistance to spike. I eventually decided to just cut grooves into the mesh where the wire could sit. This made things more robust and resistant to movement, and combined with more careful handling procedures and the use of hot glue on the edges, I was able to mount the new diaphragm tightly in the tunnel. After tightening all the bolts, I measured the resistance again, but it was only around 0.2-0.3 ohms instead of the 0.4-0.5 ohms I was getting before. I was a bit worried that there might be some kind of short in there, but I figured the extra compression from being mounted in the tunnel would lower the resistance a lot. After measuring the resistance of the diaphragm with the long connecting wires to my remote setup, however, it was about 1.4 ohms. This was quite surprising, but I figured that’s just how long wires work sometimes, so I went ahead and tried to test again.
However, the diaphragm again failed to pop, and this really confused me. With more multimeter testing, I found that the current was way lower than anticipated, and it also decreased during the test. When I was opening up the multimeter leads after the test, however, I was in for a surprise:


The connection apparently had an insane amount of resistance, and it heated up enough to melt the electrical insulation of the wire and the plastic covers on the multimeter lead. There was also a nasty bit of oxide on the copper, which would explain why the current decreased. After even more testing, I grew confident that these connections were the main issue, especially after I found the theoretical resistance of the entire circuit was around 0.65 ohms. The current, however, indicated a resistance of about 2 ohms, meaning our connections just ate about 1.35 ohms of resistance. They not only ate up the majority of my power, but they also lowered the total power delivered, and the heat they generated was a major safety problem. I replaced the wire with one that was better at electrical contact, and tried to minimize wire connections. I then tried to test the resistance again, but my multimeter was giving me absurd and fluctuating readings of over 100 kilohms. I was very confused, and I couldn’t find anything wrong with the circuit path, so I tested the resistance of the diaphragm itself and it gave the same results. I could tighten the bolts to lower the resistance to around 200 ohms, but this was still extremely high, so I figured I should probably open up the diaphragm to see what was up.
Almost immediately, though, I could tell something went horribly wrong. I was hit with a really strong burnt plastic smell, and it only got stronger the more I opened up the diaphragm. My dust mask barely seemed to help, so going as fast as possible I opened up the bolts, snapped some pictures, and left the testing room’s potentially carcinogenic air:
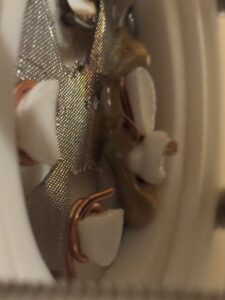
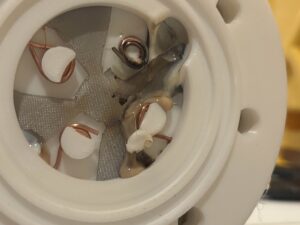
The diaphragm clearly made a bunch of heat from all my testing, and at some point it just gave out. Clearly, I was wrong and there was actually a short, and it looked like the top right structural copper wire had arced onto or touched the stainless steel mesh where it wasn’t supposed to. This caused enough heat to melt and discolor the plastic, and it looked like the stainless steel got a fair bit of oxidation as well.
Right now, I’m working on a new diaphragm design that should hopefully avoid the shorting issues by positioning the copper holders farther from the center. I also made it thinner by my advisors’ request. Hopefully I can get a third test off today or tomorrow, but I’m not sure. In any case see you next time!
Leave a Reply
You must be logged in to post a comment.