I kind of hate a specific plastic now(Shock Tube Blog #8)
April 12, 2025
Hi all,
Since the recent successful depressurization test, I’ve been really hopeful in the future of this project, because that actually validated the viability of J-B welding joints like this, as well as the viability of using the 3D printed plastic diaphragms to hold a vacuum. The general next step is conducting a full test, and there are three main things that we need to work on before then: Schlieren, diaphragm, and model mounting. However, I ended up only working on the model mounting due to a combination of just losing important stuff and other issues we’re about to get to…
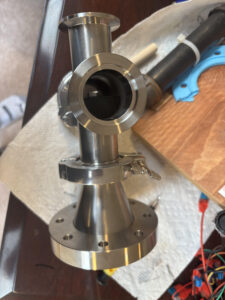
Early in the week, I began designing and printing a few parts to hold the model in the tunnel. My idea is to use a stainless steel rod connected to a 3D printed part which fits snugly in the tunnel. However, I’d realized that all my planned mounting mechanisms from a few months ago used some kind of adhesive which would probably outgas in vacuum and cause all sorts of problems. I also really didn’t want to J-B weld it, because that was a strong and permanent epoxy which would probably be near-impossible to undo. I was pretty much left with only one real option, which was to fix it inside the tunnel using just stainless steel nuts and bolts. I designed the following setup, where the half-cylinder would fit neatly inside a cross-connector, and the partial cone would slot into the KF-CF adapter piece. Then, new models could be attached to a rod connected to the third expendable piece, which would be temporarily bolted to the partial cone. All parts were designed with air ducts to allow air to be sucked out of the driven tube.
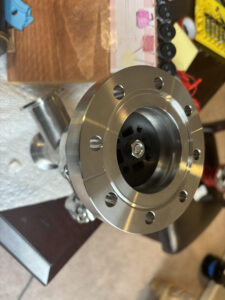

I’d initially had a lot of trouble printing these; I thought I couldn’t use bed glue because the residue would likely outgas in vacuum, so I resorted to just cleaning the bed with isopropyl alcohol and hoping for the best. That was really inconsistent though, and these parts in particular just couldn’t stop detaching from the bed. However, I then had the idea to use a sacrificial plate between the model and the bed. This way, I could use glue to secure the model to the bed without having the glue residue remain on the model itself.


This actually worked out really well, and despite some surface roughness, I’m really happy with how the parts turned out. All parts were made using high infill PLA plastic, which should be strong enough to resist the forces given that they’re mounted securely. However, what it wasn’t strong enough for were my wrenches:

Many of my CF connector bolts were in really weird positions, and I’d need to constantly tighten and untighten them to put in new diaphragms and models. I tried making custom wrenches for these out of PLA, but even after making them ridiculously thick and cranking up the infill to 70%, they kept getting deformed, especially after multiple uses. I really didn’t want to have to print a new wrench for every two bolts to be tightened, so after some thought, I decided to try and look for a new material. My printer, the Flsun T1 Pro, is quite advanced, and the manufacturer stated it could print PLA, PETG, PVA, PET, ABS, ASA, PA, and PC. After some research, I found that PC(polycarbonate) was probably best from these options, being stronger and harder than PLA. However, it was apparently really tricky to print compared to PLA, and is is also twice as expensive. I figured, though, it was about time that I graduated to a better filament in general, and even if it didn’t work for wrenches, it could be a handy skill to know.
With that, I ended up buying a 1kg spool and it arrived a few days later. It felt bendier and more elastic, which was odd considering the stress-strain graphs I had consulted earlier while researching PC, but I was still really excited to try it out. I immediately cracked it open and tried to print a bunch of wrenches. Considering how many I was trying to print, and the fact that it was my first attempt, it went surprisingly well. However, after the first layer the filament broke off:

and resuming it probably messed it up. I think it was also really struggling to print the infill pattern, so I just went with 100% infill from then on. However, it was still insanely finicky, and I spent the next two days just solely focused on trying different things. A lot of research and many attempts later, this was the best procedure I could come up with:
1) Wipe down the print bed with water and isopropyl alcohol.
2) Set the temperature settings to PLA and wait a few minutes with the door open to vent alcohol fumes.
2) Add some PVA glue stick and spread it around the bed with napkins or a microfiber cloth.
3) Bed level.
4) Wait 10 minutes.
5) Start print with hotend at 280˚C, bed temp 60˚C, min fan speed 0%, max fan speed 65%, temp control w/ 40˚C chamber.
I ended up getting something that was about 30 layers thick as my best attempt, but it was really warped. The layers also got misaligned, so despite some cleanup with an Exacto knife, it still couldn’t even fit a bolt all the way through.


I was really stuck, and despite wanting to figure out how to print PC, I knew it was taking up way too much time this late in the game. I could order a 3D print online out of a different material, but that might not even be strong enough, and I might get the dimensions mixed up. Also, depending on the infill and material it would be somewhat expensive, and it would take a while to ship. My girlfriend then suggested just bending an off-the-shelf socket wrench to fit the angles that I need, which she’d successfully done for a robotics project. I thought that this’d be difficult, but probably way easier than whatever I was trying to do with the printer, so I looked on Amazon for some socket wrenches. I then found one with a hinge, so ideally I wouldn’t even have to bend it at all, so I ordered it along with a bunch of bits(hopefully one of which can fit the bolts I have). It wasn’t easy, but I think I can get all the bolts with this new wrench without having to bend it, so I should be good on that front.
I also switched my 3D printer filament back to PLA, and put the PC filament in a storage box along with some drying agent in case I ever got the courage to try again. However, you are only really done with PC once PC decides it is done with you; I afterwards accidentally tried to print PLA on PC temperature settings, which was not only embarrassing, but also a huge pain safety-wise. I had caught it really early after it had only printed a few grams, which was good, but you really aren’t supposed to try to print PLA at a temperature 60˚C higher than normal. According to ChatGPT(but notably not really anything else), when heated excessively, PLA can break down into various smaller molecules including formaldehyde! I also noticed a slight smell when opening the printer door, which wasn’t a great sign. I decided to just clean up the print bed with a mask and gloves, and come back tomorrow to leave any potential vapors to just vent out.
This week was definitely one of the less productive ones, mostly thanks to my admittedly strange decision to try and print a way more difficult material to chase a marginal performance improvement, but I still think we can build out the rest of the system in time. Thanks for reading and see you all next time!
Leave a Reply
You must be logged in to post a comment.